
Introduction
When it comes to sharing files online, many people rely on big cloud services like Google Drive or WeTransfer. They’re easy to use — but they also come with trade-offs: limited control, privacy concerns, and dependency on third-party infrastructure.
If you’re looking for a solution that gives you full control over your data, without compromising on usability or design, it’s time to consider hosting your own platform.
This is where Erugo comes in.
Erugo is a powerful self-hosted file-sharing application built with PHP (Laravel) and Vue.js. It offers a clean and modern web interface where users can securely upload and share files — whether it’s with colleagues, clients, or across your own devices. With Erugo, you decide where your files live and how they’re handled.
In this step-by-step guide, I’ll show you how to install and configure Erugo on your own server using Docker. We’ll cover everything from domain setup and SSL certificates to running the app behind a secure reverse proxy.
To make things easy, we’ll be using Hetzner Cloud as our hosting provider — it’s affordable, fast, and ideal for self-hosted applications like this one.
Whether you’re setting this up for personal use, a small team, or even as a foundation for a client-facing service, this tutorial will help you get Erugo up and running with confidence.
Let’s get started.
This guide follows the official documentation from:
- Docker installation and some shortcuts
- Docker post-installation
- My configuration related to the Nginx Proxy Manager
- My configuration related to Erugo docker-compose.yml
Article Roadmap
Here’s what we’ll cover step-by-step:
- Hardware Requirements
- Creating the Server on Hetzner
- Connecting to the VM
- Configure Docker ecosystem
- Domain and DNS Prep
- Reverse Proxy Setup
- Erugo Core
Hardware Requirements for Erugo
Erugo doesn’t have officially published hardware requirements, but based on its technology stack (PHP, Laravel, Vue.js) and typical usage scenarios, we can make some informed recommendations.
For this tutorial, we’ll be using the Hetzner Cloud CX22 VPS, which provides a great balance of performance and affordability for self-hosted applications.
Recommended Minimum Specs
- CPU: 2 vCPU (or more)
- RAM: 4 GB
- Storage: 40 GB SSD (or more)
- Bandwidth: At least 10 Mbps symmetrical; higher is better for file transfers
These specs are suitable for light to moderate usage — ideal for personal use or small teams.
Storage Considerations
The amount of storage you’ll need depends entirely on how many files you plan to store and share. While 40 GB may be sufficient for basic usage, you should choose your server size based on:
- The average file size you expect to upload
- The total number of files
If needed, you can always scale up later or attach additional volumes.
Creating the Server on Hetzner
Environment Preparation
If you don’t already have a Hetzner Cloud account, you must create one by visiting https://hetzner.cloud/?ref=vJLpYsXw0BK6 and completing the registration process.
By using this referral link, you’ll receive €20 in Hetzner Cloud credits to get started!
Once you click the referral link, you’ll see a congratulations page confirming that you’ve received cloud credits. Click “Continue” to proceed with the registration process.
You’ll then be redirected to the main Hetzner Cloud page, where you can learn more about their services. To complete your account creation, click the red “Sign Up” button in the top-right corner and follow the registration steps.
After completing your registration, you can access the Hetzner Cloud console at https://console.hetzner.cloud/projects to start creating your first server.
Registered users can access the Hetzner Cloud console at https://console.hetzner.cloud/projects.
Once logged in:
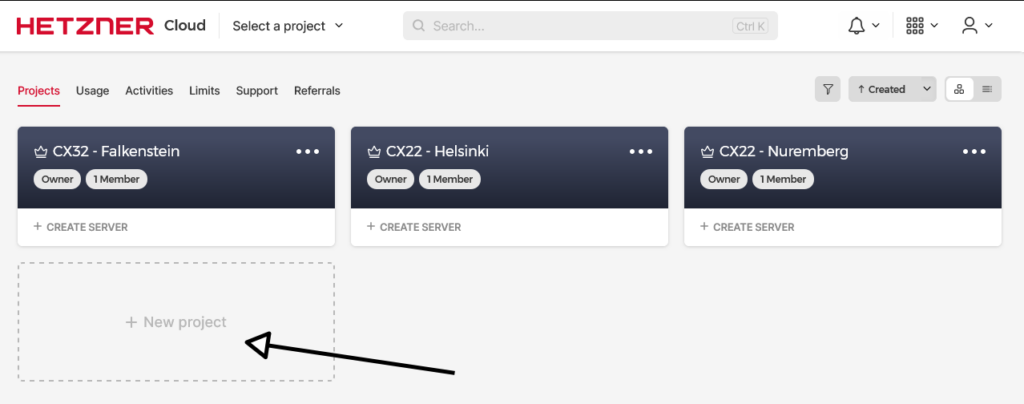
- Click on “+ New project”
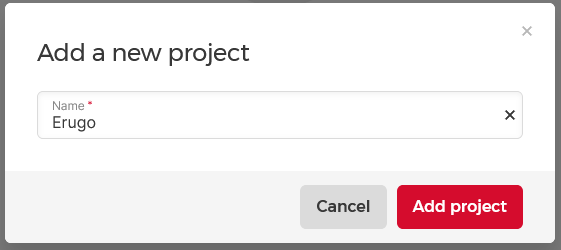
- Create a project named “Erugo“
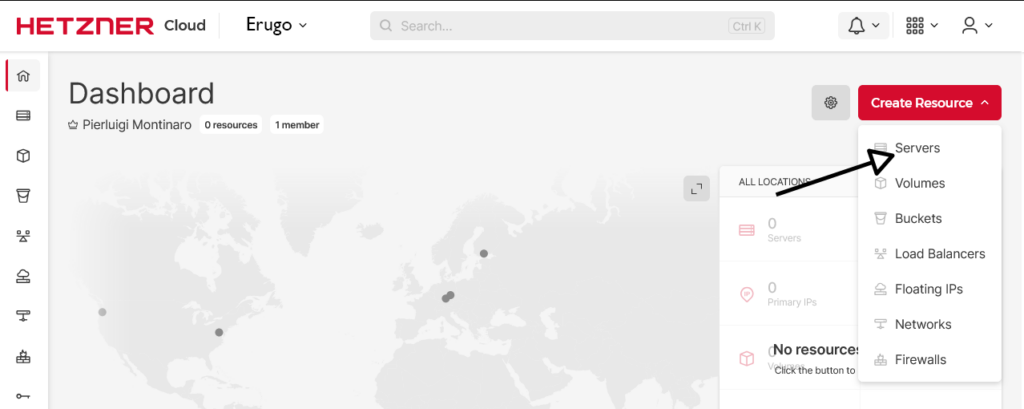
- Access the project and click the red “Create Resources” button followed by “Servers”
Server Configuration
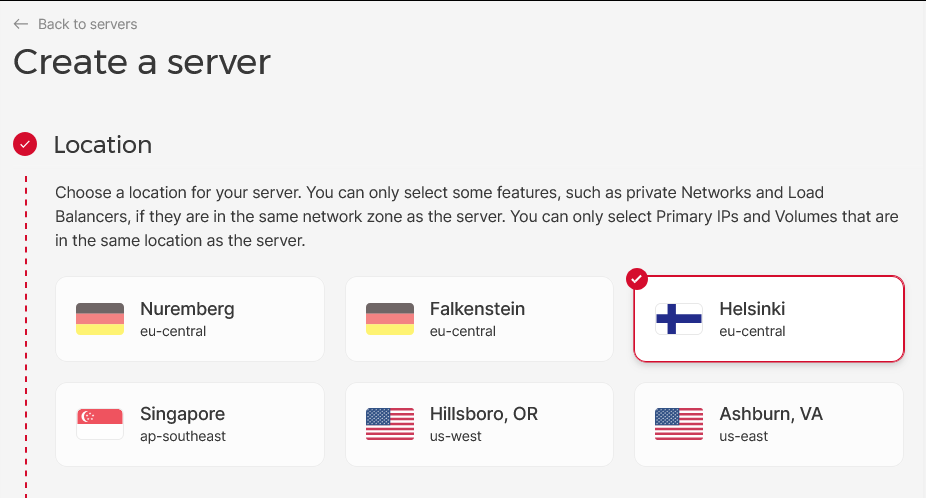
- Location: Helsinki
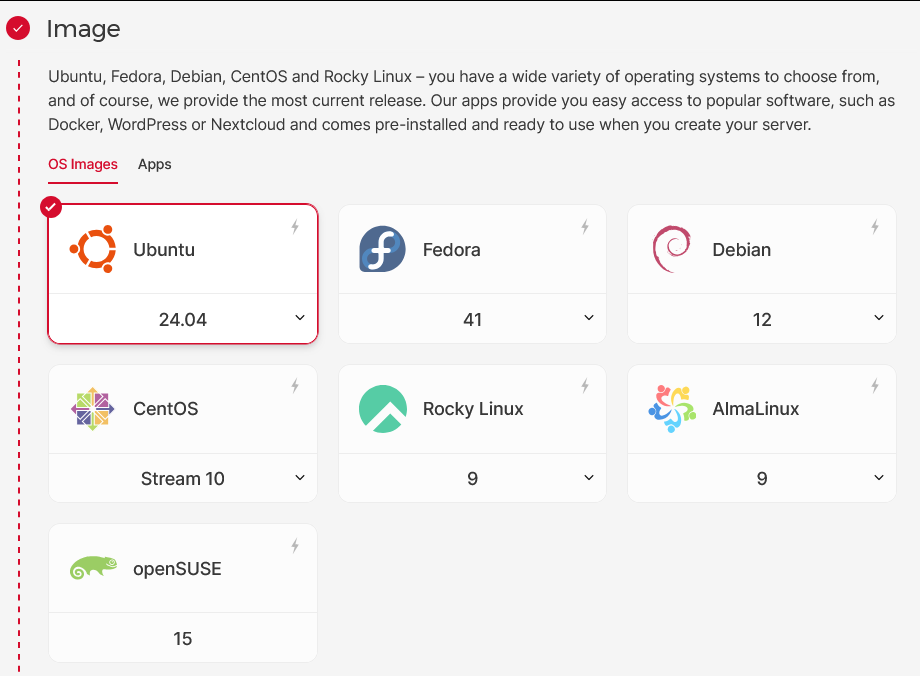
- Image: Ubuntu 24.04
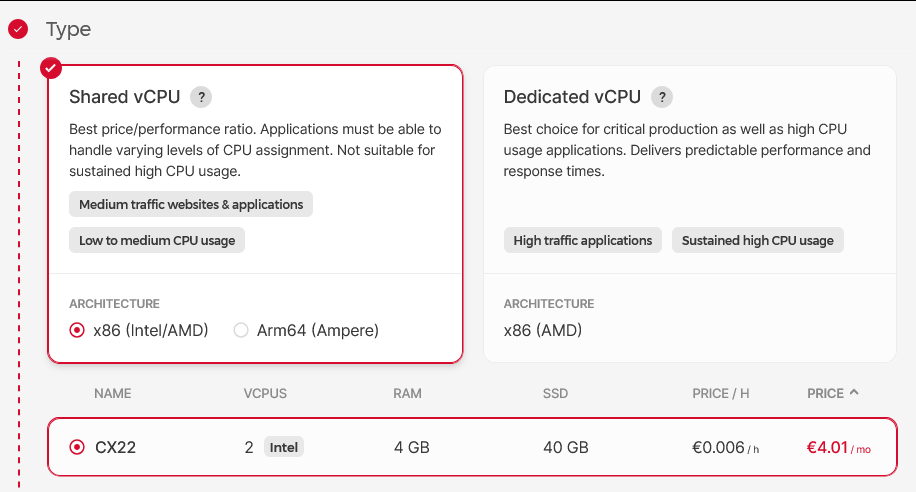
- Type: Shared vCPU (Architecture: x86 Intel/AMD)
- Server: CX22 (2 vCPUs, 4GB RAM, 40GB SSD)
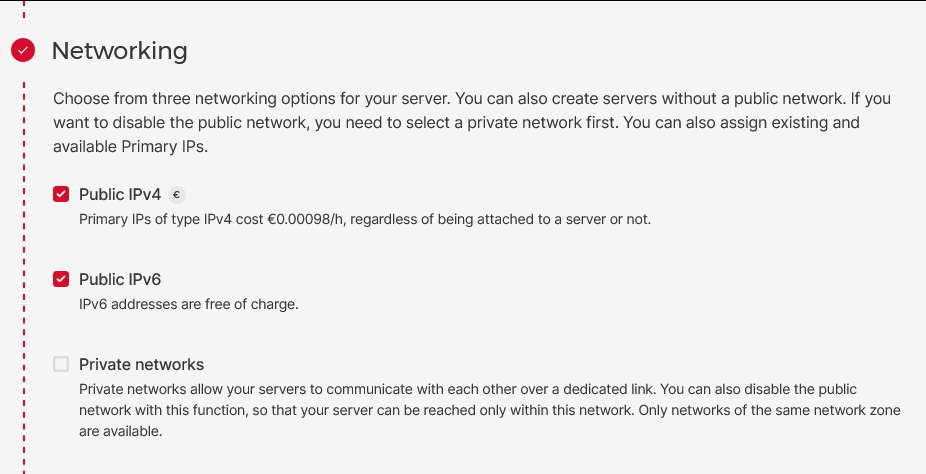
- Networking: leave default settings with public IPv4 and IPv6
- For the “SSH keys” section, we need to prepare the keys.
SSH Key Configuration
Security is paramount, so we’ll use an Ed25519 SSH key, which offers better security and efficiency compared to RSA and ECDSA.
Before proceeding on the Hetzner console, let’s generate our SSH key on our local Linux machine using the command:
ssh-keygen -t ed25519 -f ~/.ssh/id_ed25519_hetzner_erugoOn the Hetzner console, in the “SSH Keys” section:
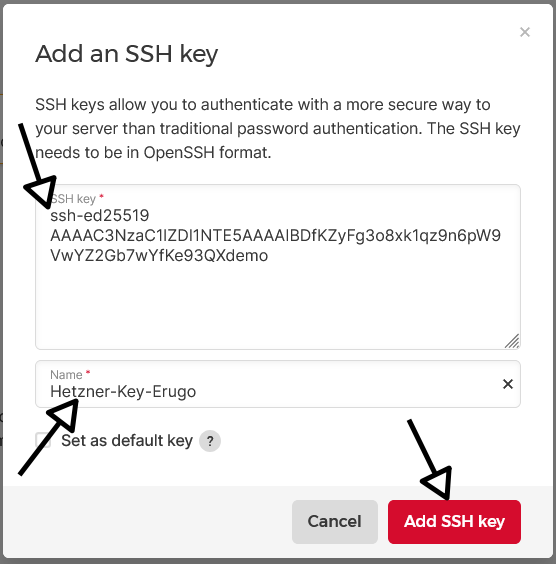
- Click on “+Add SSH key”
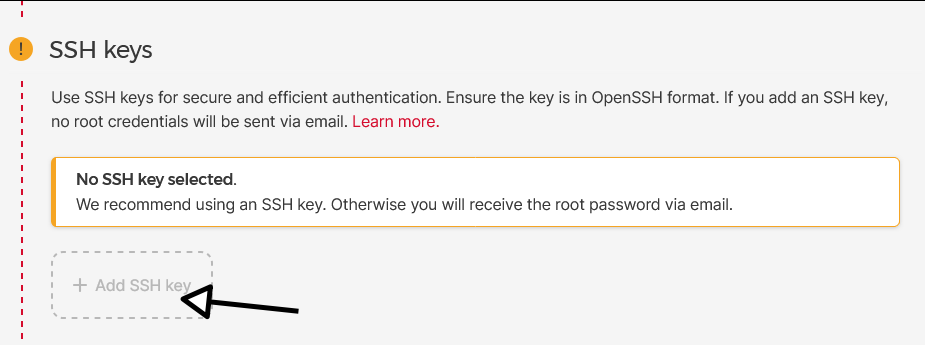
- Paste the contents of ~/.ssh/id_ed25519_hetzner_erugo.pub (the public key)
- Give your key a name (e.g., “Hetzner-Key-Erugo“)
- Click on “Add SSH key”
Completing VM Configuration
For the remaining sections:
- Skip “Volumes”, “Firewalls”, “Backups”, “Placement groups”, “Labels”, and “Cloud config”
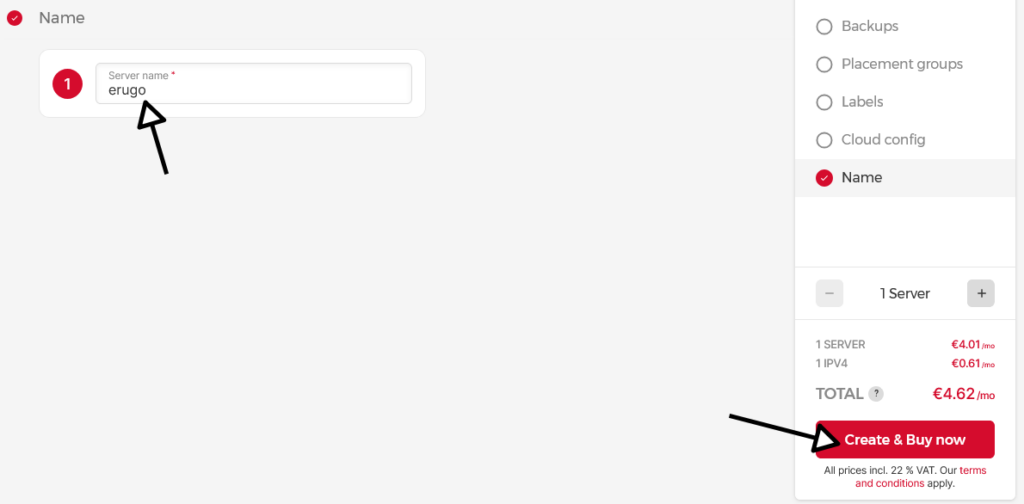
- Name the VM “erugo“
- Click the “Create & Buy now” button at the bottom right to create the VM
- Obtain your IP address after a few minutes

In my case, I got the IP address 203.0.113.1
Connecting to Your VM
Initial Root Connection
First, connect to your newly created VM as root:
ssh -i ~/.ssh/id_ed25519_hetzner_erugo root@203.0.113.1Creating a Non-Root User
For security best practices, it is recommended that a dedicated non-root user run Docker instances instead of using the root account. This enhances security by limiting privileges and reducing potential attack vectors.
Some cloud providers, such as Vultr, automatically create a non-root user (e.g., ubuntu, debian, or ec2-user). If your provider has already created a non-root user, you can use that user instead of creating a new one.
However, on Hetzner Cloud, there is no default non-root user, so we need to create one manually. This guide will create a user named erugo and configure passwordless sudo access.
# Create the erugo user
adduser --disabled-password --gecos "" erugo

# Add erugo user to sudo group
usermod -aG sudo erugo

# Set up SSH key authentication
mkdir -p /home/erugo/.ssh
cp /root/.ssh/authorized_keys /home/erugo/.ssh/authorized_keys
chown -R erugo:erugo /home/erugo/.ssh
chmod 700 /home/erugo/.ssh
chmod 600 /home/erugo/.ssh/authorized_keys

# Configure passwordless sudo for erugo user
echo "erugo ALL=(ALL) NOPASSWD:ALL" > /etc/sudoers.d/erugo
chmod 440 /etc/sudoers.d/erugo
Switching to Erugo User
Logout from the root session and reconnect as erugo user:
ssh -i ~/.ssh/id_ed25519_hetzner_erugo erugo@203.0.113.1System Preparation
Now that we’re connected as the erugo user, let’s proceed with Docker installation in the fastest way I know.
Docker Installation
Execute the following command to install Docker:
bash <(wget -qO- https://get.docker.com)User Configuration
To avoid using sudo for every Docker command, add your user to the docker group:
sudo usermod -aG docker $USERInstallation Verification
Log out and log back in to apply the group changes, then verify the installation with:
docker run hello-world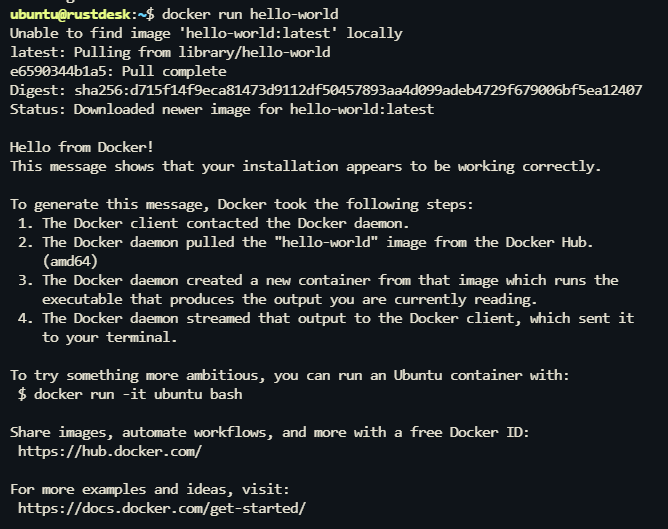
Domain and DNS
Configuring DNS Records in Cloudflare for Erugo
You’ll need to configure DNS records to access your Erugo application via a custom domain.
Below, I’ll guide you through the process of setting up an A record and a CNAME record in Cloudflare. While this example uses Cloudflare, the steps are similar for other DNS providers.
Create an A Record
- Log in to your Cloudflare account and select your domain (e.g.,
montinaro.ovh). - Navigate to the DNS settings tab.
- Add a new record:
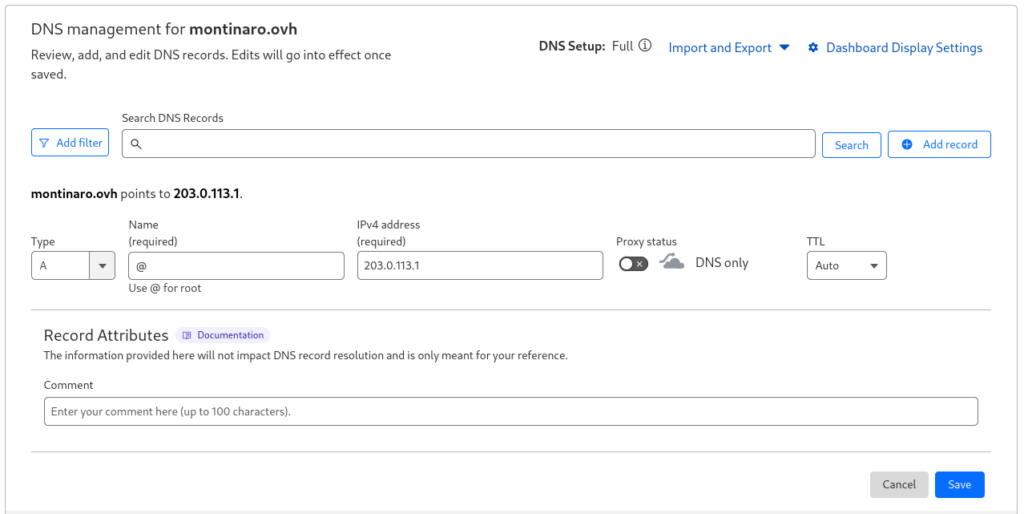
Fill the fields with the correct values, I’ll use:
- Type: A
- Name:
@(this represents the root domain, e.g.,montinaro.ovh) - IPv4 Address: Enter the public IP address of your server (e.g.,
203.0.113.1) - Proxy Status: Set to “DNS only” (gray cloud icon)
- Save the record clicking on “Save” button
Here’s how it should look once created:

Create a CNAME Record
- Still in the DNS settings tab, add another record:
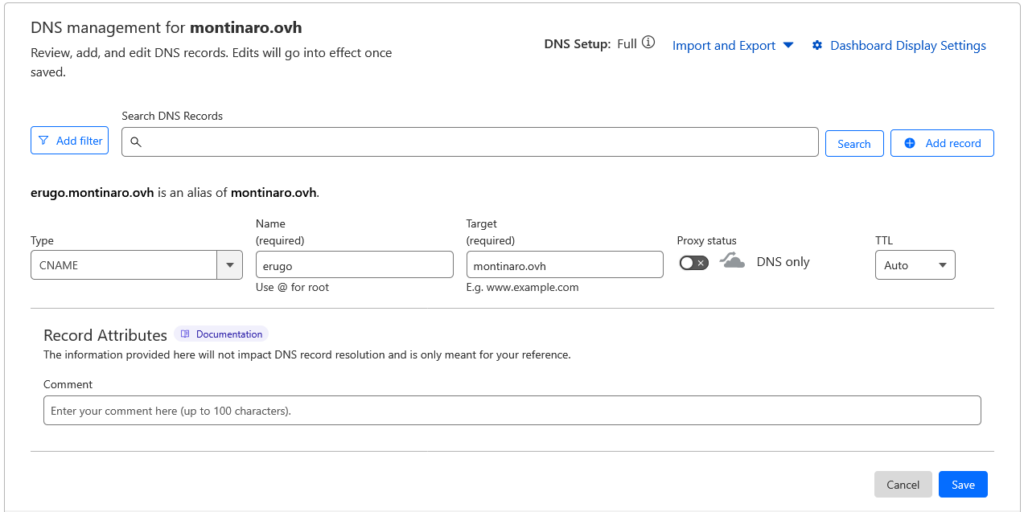
Fill the fields with the correct values, I’ll use:
- Type: CNAME
- Name:
erugo(this will createerugo.montinaro.ovh). - Target: Enter your root domain (
montinaro.ovh). - Proxy Status: Set to “DNS only” (gray cloud icon).
- Save the record clicking on “Save” button
Here’s how it should look after creation:

Why These Records?
- The A record points your root domain (
montinaro.ovh) to your server’s IP address. - The CNAME record creates a subdomain (
erugo.montinaro.ovh) that redirects traffic to the root domain.
Note for Other Providers
If you’re using a different DNS provider, the process is similar:
- Create an A record pointing to your server’s IP.
- Create a CNAME record for the subdomain pointing to the root domain.
Configuring Reverse Proxy: Nginx Proxy Manager
To secure and efficiently manage web access to Erugo, I use Nginx Proxy Manager (NPM) as a reverse proxy.
What is Nginx Proxy Manager?
Nginx Proxy Manager (NPM) is a user-friendly web interface for managing Nginx reverse proxy configurations. It simplifies setting up SSL certificates, handling multiple domain names, and configuring reverse proxy rules without requiring direct modifications to Nginx configuration files.
Features of Nginx Proxy Manager
- Easy-to-use Web UI – No need to edit config files manually.
- Built-in SSL Management – Automatically request and renew Let’s Encrypt certificates.
- Simplified Proxy Rules – Quickly set up and manage multiple proxy hosts.
- Access Control & Logging – Additional security features like IP blocking and logging.
Nginx Proxy Manager Configuration
Preparing the Environment
First, create a dedicated directory for our Nginx Proxy Manager setup:
mkdir nginx-proxy-manager
cd nginx-proxy-manager
Creating docker-compose.yml
Create and edit the Docker Compose configuration file:
nano docker-compose.ymlAdd the following content:
services:
  app:
    image: 'jc21/nginx-proxy-manager:latest'
    container_name: nginx-proxy-manager
    restart: always
    environment:
      PUID: 1000
      PGID: 1000
      DISABLE_IPV6: 'true'
    ports:
      - '80:80'
      - '81:81'
      - '443:443'
    volumes:
      - ./data:/data
      - ./letsencrypt:/etc/letsencrypt
    healthcheck:
      test: ["CMD", "/usr/bin/check-health"]
      interval: 10s
      timeout: 3s
    deploy:
      resources:
        limits:
          memory: 2G
        reservations:
          memory: 1G
    networks:
      - nginx_internal_network

networks:
  nginx_internal_network:
    name: nginx_internal_network
    driver: bridge
Erugo Configuration
Preparing the Environment
First, create a dedicated directory for our Erugo setup:
mkdir erugo
cd erugo
Creating docker-compose.yml
Create and edit the Docker Compose configuration file:
nano docker-compose.ymlAdd the following content:
services:
  app:
    image: wardy784/erugo:latest
    restart: always
    container_name: erugo
    volumes:
      - /home/erugo/Erugo-Storage:/var/www/html/storage
    # ports:
    #   - "9998:80"
    deploy:
      resources:
        limits:
          memory: 2G
        reservations:
          memory: 1G
    networks:
      - nginx_internal_network

networks:
  nginx_internal_network:
    external: true
Persistent Storage Setup
In the docker-compose.yml, pay attention to this line:
- /home/erugo/Erugo-Storage:/var/www/html/This mounts the directory /home/erugo/Erugo-Storage on your server as the storage location inside the container. It ensures that any files uploaded through Erugo are stored persistently on your host, not just inside the container.
This means:
- Files won’t be lost if the container is recreated.
- You can easily back up or inspect the uploaded files from the server.
Before starting the container, make sure the directory exists and has the right permissions:
mkdir -p /home/erugo/Erugo-Storage
chown -R $(id -u erugo):$(id -g erugo) /home/erugo/Erugo-Storage
Starting Nginx Proxy Manager service
Launch the Container
From the nginx-proxy-manager directory where we created the docker-compose.yml file, start the service and view the log:
docker compose up -d && docker compose logs -fThe -d flag runs the containers in detached mode (background), while logs -f allows us to monitor the logs in real-time.
Starting Erugo
Launch the Container
From the erugo directory where we created the docker-compose.yml file, start the services and view the logs:
docker compose up -d && docker compose logs -fThe -d flag runs the containers in detached mode (background), while logs -f allows us to monitor the logs in real-time.
Accessing Nginx Proxy Manager via the Browser
Accessing Nginx Proxy Manager via the Browser
Once Nginx Proxy Manager is running, you can access its web interface to configure your reverse proxy settings. Follow these steps:
Open the Admin Interface
- Open your browser and navigate to the following URL:
http://<SERVER-IP>:81; replace<SERVER-IP>with the public IP address of your server.
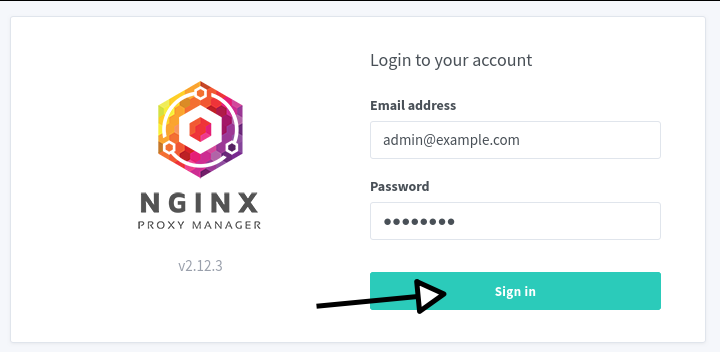
In my case, I’ll usehttp://203.0.113.1:81 - You will see the Nginx Proxy Manager login screen
- Use the default credentials to log in:
- Email: admin@example.com
- Password: changeme
Update Admin Credentials
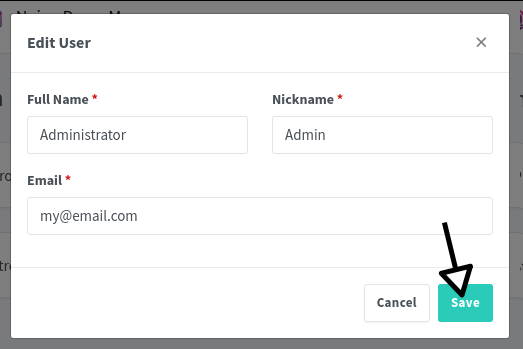
- After logging in, you will be prompted to update your credentials for security purposes.
- Enter a new Full Name, Nickname, and a valid Email Address in the fields provided.
- Save the changes by clicking the green Save button.
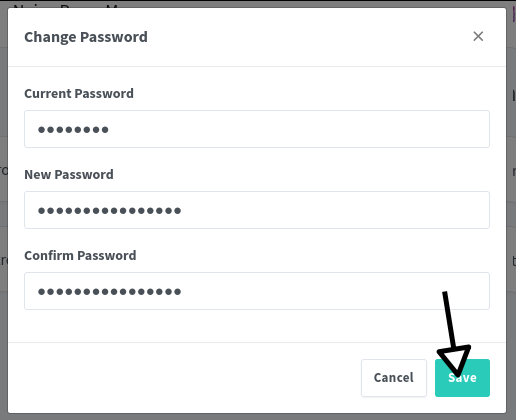
- Next, change the default password, navigating to the password change section.
- Enter your current password (
changeme) and set a new strong new password.
Ready to Configure Proxies
Now that you’ve secured your admin account, you’re ready to set up proxy hosts for Erugo.
Configuring a New Proxy Host in Nginx Proxy Manager
Now that you can access the Nginx Proxy Manager interface, it is time to create a new proxy host for your Erugo.
Navigate to Proxy Hosts
- From the Nginx Proxy Manager dashboard, click on “Hosts” in the top menu.
- Select “Proxy Hosts” from the dropdown. Navigate to Proxy Hosts.

Add a New Proxy Host
- Click the green “Add Proxy Host” button.
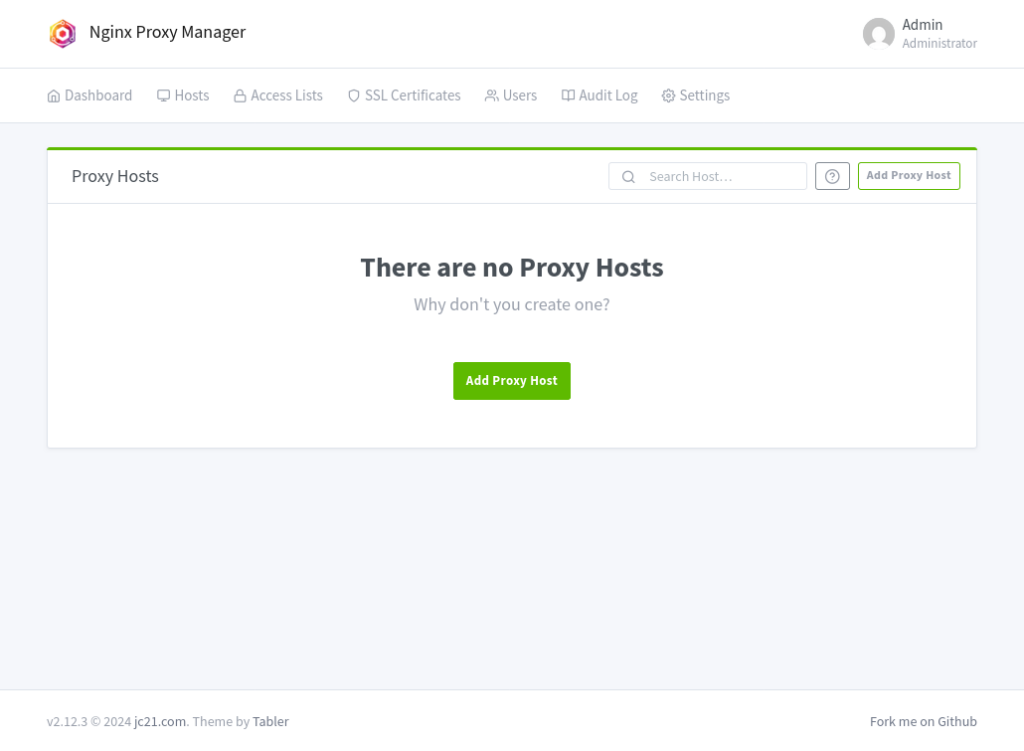
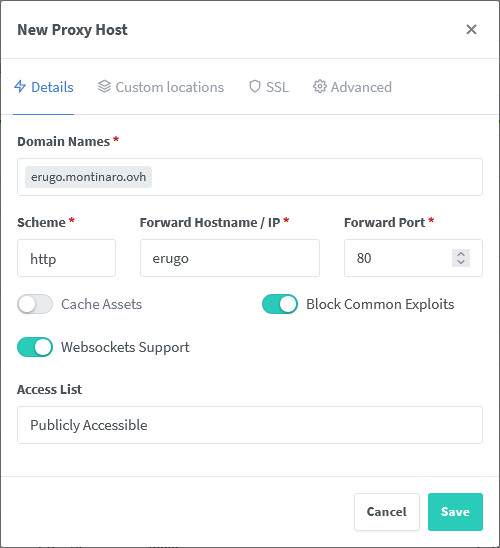
- Fill in the following details under the Details tab:
- Domain Names: Enter your subdomain, I’ll use erugo.montinaro.ovh
- Scheme: Select
http. - Forward Hostname / IP: Enter your server’s private IP or hostname (e.g.,
erugo). - Forward Port: Enter the port where Erugo is running (e.g.,
80). - Enable Websockets Support and Block Common Exploits.
- Leave “Access List” as “Publicly Accessible.”
- Your configuration should look like this:
Configure SSL
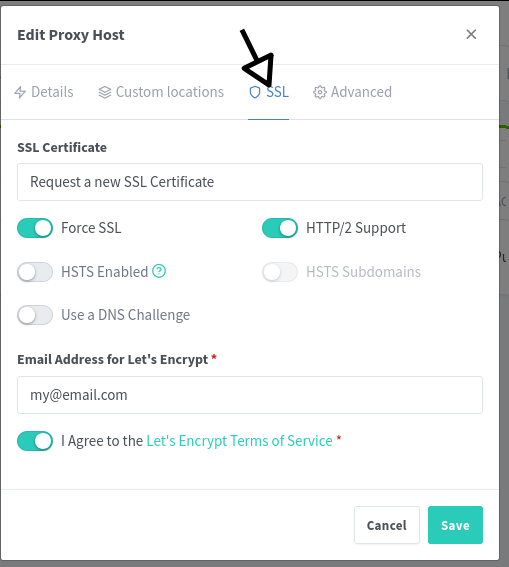
- Click on SSL
- Select “Request a new SSL Certificate”.
- Enable:
- Force SSL
- HTTP/2 Support
- Enter your email address for Let’s Encrypt.
- Agree to the Let’s Encrypt Terms of Service.
- Click Save and wait for the SSL certificate to be issued.
After a few seconds you’ll see something like this:

Understanding Docker Networking Between Erugo and NPM
In this setup, Nginx Proxy Manager and Erugo are both running as Docker containers and are connected to the same user-defined bridge network named nginx_internal_network.
This shared network is what allows Nginx Proxy Manager to forward traffic to Erugo using the container name erugo as the hostname — without needing to know or configure the internal IP address of the Erugo container.
Why This Works
Docker’s user-defined bridge networks come with automatic DNS-based service discovery. That means:
- Each container in the network can reach the others by using the container name as a hostname.
- When NPM needs to route traffic to Erugo, it can safely forward it to
http://erugo:80.
No need to expose port 80 on the host, no need to look up internal container IPs — everything is handled transparently inside the Docker network.
Connect to Erugo
Once everything is configured, test your setup by navigating to your subdomain (e.g., https://erugo.montinaro.ovh). You should now see your Erugo interface accessible securely over HTTPS.
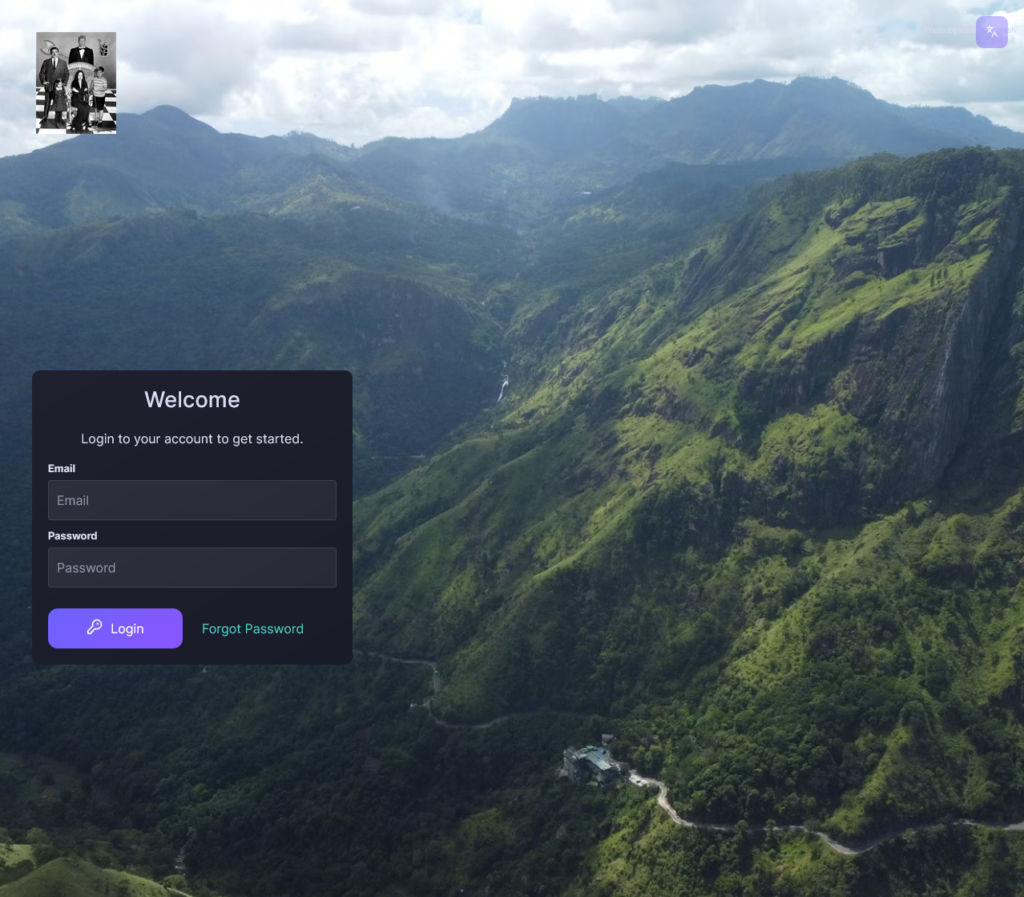
At this point, your Erugo instance is fully configured and ready for your file sharing experience!
Acknowledgments
A sincere thank you goes to the creator of Erugo, a skilled and experienced developer who has clearly brought years of professional expertise into this project. While Erugo is still a relatively young platform, it already stands out for its clean architecture, thoughtful design, and strong focus on real-world usability.
This is not just another “clone” of WeTransfer or a quick open-source alternative. Erugo was built with security, extensibility, and user experience in mind — a refreshing difference in a landscape often dominated by opaque, ad-driven cloud services.
In a time when data privacy is constantly under threat and centralized platforms often trade convenience for control, Erugo offers a compelling self-hosted alternative. It gives individuals and organizations the ability to own their infrastructure, protect sensitive data, and share files securely — without compromising on style or functionality.
We’re grateful for open-source projects like this one, and we hope this guide helps more people discover and deploy Erugo with confidence.
Leave a Reply